The Necks
It all started with the wear and tear on the neck one of my guitars. A few of the frets had worn down and needed attention. I wanted to try and fix the frets myself but having never done any fret work, I didn't want to start out on an expensive, professional neck. So I thought, if I could get a cheap neck to practice on, maybe I could build my confidence on that.So after much internet browsing, I saw some guitar necks on AliExpress that were super cheap that looked pretty good so I decided to go to Chinese Vegas and roll the dice. I found a super cheap neck, then found a beautiful looking inlayed neck. Suddenly, ideas started sparking and after a considerable search, I hedged my bets and bought two necks from two different sellers for around $100USD for both. Hopefully, this would no longer just be about fret practice...
 |
The first neck was encased in styrofoam inside a cardboard box, ample care had been taken in the packaging and the packaging looked reasonably professional. Time taken from order to delivery was exactly 3 weeks. The neck was a typical maple Strat style neck and cost $37.15 USD. I know, how could anything that cheap be any good... |
 |

|
| When I opened the box and took the neck out I was amazed at the quality. The neck was almost perfectly straight with no twist in the headstock. Frets were well seated, correctly spaced and the height of the frets relative to each other was excellent. The fret edges were a little rough but nothing to worry about. In fact the only fault I could find with this neck was that the heel was not perfectly shaped. The dimensions of the heel did not conform to a "standard" Strat neck so switching this neck straight into a real Strat would not work. | 
|

| 
|
The neck was satin finished and was silky smooth although I didn't get the impression that there were many coats applied. The overall thickness was slightly thicker than a standard Strat and the radius of the neck feels somewhat flatter than a standard Fender. All up this was massive value for money.

|

|

|
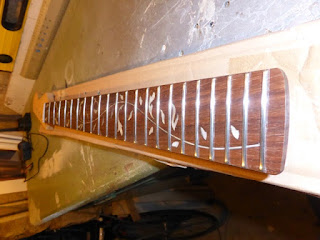
When I finally got the neck out of the packaging, it was a beautiful thing! The inlay was perfect and looked brilliant against the rosewood neck. The fret edges were super smooth however on close inspection there were a number of flaws in this neck. Three of the frets above the twelfth fret were pushed in so hard there were dents in the face of the fret that were easily felt by touch. Odd that only three were affected as all the other frets were perfect. The neck itself is straight enough although there is a slight but noticeable twist in the headstock when compared against the heel by sighting down the underside of the neck. The heel is also not standard Fender dimensions so this neck is also not a good candidate for a replacement neck. |
Very hard to fault the inlay, I don't know how they make these but the job on this neck was awesome. Flush to the neck and no obvious gaps in the work. |
 |
It will be interesting to see how effective the truss rods are when the necks are under pressure but the next step is to re-crown the frets on the rosewood neck.
Re-crowning the Rosewood Fretboard
To fix the three frets on the rosewood neck, the frets had to be filed down to the low point on the flawed frets and then re-crowned. Unfortunately there is no easy way to do this without involving all the other frets as the fret heights must remain in line across the length of the fretboard.Following a number of guides on the internet, I masked off the neck using masking tape until only the frets were exposed. I made a simple fret levelling tool by gluing some 80 grit sandpaper to a flat, dressed block of pine. Then in long strokes, trying to keep everything as even as possible across the whole fretboard, I started sanding back the top of the frets. I kept going until I could see the bottom of the dents being touched by the sandpaper.
The next step was to re-crown all the frets as the fret levelling had left a flat surface on the face of the frets. Frets need to be rounded so that the intonation occurs at the highest point in the fret. So I bought one of these from Stew Mac.

Recrowning the Frets
This tool came in three sizes, small, medium and large. I had no idea which one to get so I went for medium. The frets are now much rounder than they were originally, maybe I should have gone for a small. The tool cost $72.39 USD plus postage which is kind of ridiculous seeing the tool cost more than the neck, but I wanted to have a go at re-crowning frets and here was a perfect opportunity...I used the rough side of the fret crowning tool, followed by the smooth side, trying to keep the amount of material removed to a minimum but consistent between each fret. I then used some 100 grit sandpaper under the fret crowning tool to smooth the file marks and finished up with some steel wool. This is what it looked like afterwards. The dents in the frets are gone!

|
|
If the slight twist in the neck is of no consequence and I've actually done a decent job at levelling, this is now a usable neck.
At this point, with two seemingly serviceable necks, I was no longer interested in fixing the original guitar, I wanted to make one! And so the Ultimate Guitar Project was born...
No comments :
Post a Comment